
Planking the hull is one of the most tedious tasks, but obviously also one of the most important.
Although “actual” ships at the time were single planked on frames, this particular model will be “double planked”. Double planking means one thicker layer of wood will form the shape of the hull, and a second thinner but cleaner layer of planking will cover that for “looks”. This method takes more time, but ends up being easier as it allows the builder to smooth out any inconsistencies before the second layer is added. Single planking must be done perfectly the first time around because all of the flaws will show.
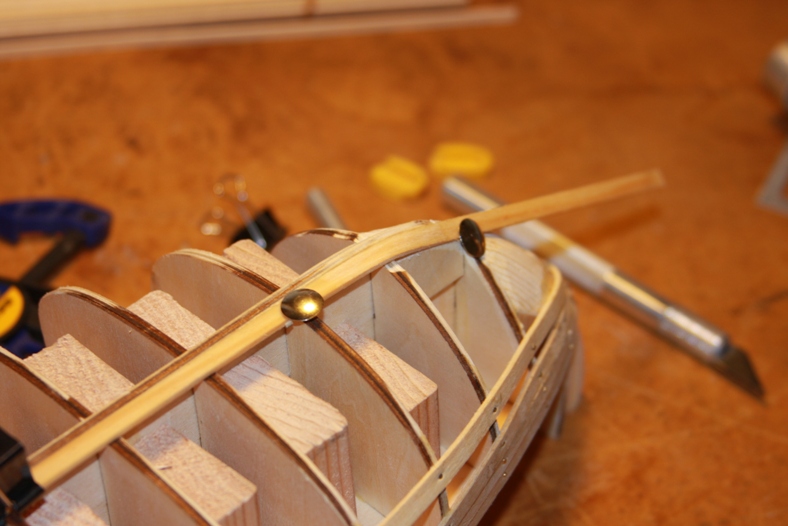

Each plank (a 1mm x 5mm x 110 mm strip) is soaked in water. The wet plank is formed to the hull and tacked in place with thumb tacks. The tacks do not go through the plank, but rather hold it in place with it’s cap.

Then a hot plank bender (essentially a soldering iron with a round head) is run along the wood to steam it and heat it. The heat dries the wood and forms it into the shaped it’s layed out in. After they are the proper shape, the planks are then glued and nailed into place.

The planks are layered starting at the bulwarks (side of the ship that meets the deck) and the garboard plank (the plank that starts at the keel) and work their way toward the center. Each plank is done one at a time and must dry before the next plank is laid. The planks are then trimmed and adjusted in a variety of ways to ensure a good fit and that all gaps are covered.
There is much more planking to be done, and much more will be covered. Because planks are done one at a time and take a fair amount of time in between, I often work on other aspects of the ship at the same time. During the planking I will work on deck fittings, railings and decks… as you’ll see in the next post.
