
The elegant and decorative head works at the bow of the ship are an intricate weaving of shaped wood that serves to facilitate the bowsprit, but also provides a distinct look to the vessel.
For builders, it is a complicated area that is quite difficult, and so visible that any errors tend to be magnified. It is for these reasons that I’d been delaying work in this area. However, I’d delayed as much as I could, and the head works must now be tacked.
I’ve noodled through what I’d like to do here, and it’ll be based on the plans to form the foundation. However, the plans omit several aspects that are too complicated for most casual builders. This isn’t unusual for commercial plans, but does cut down on the accuracy quite a bit.
On the Peg, I’ll fill in the grating, seats of ease, false rails, and other elements not included in the Peg plans. Most of these will be done in boxwood as it’s the only material dense enough to carve and shape this small.
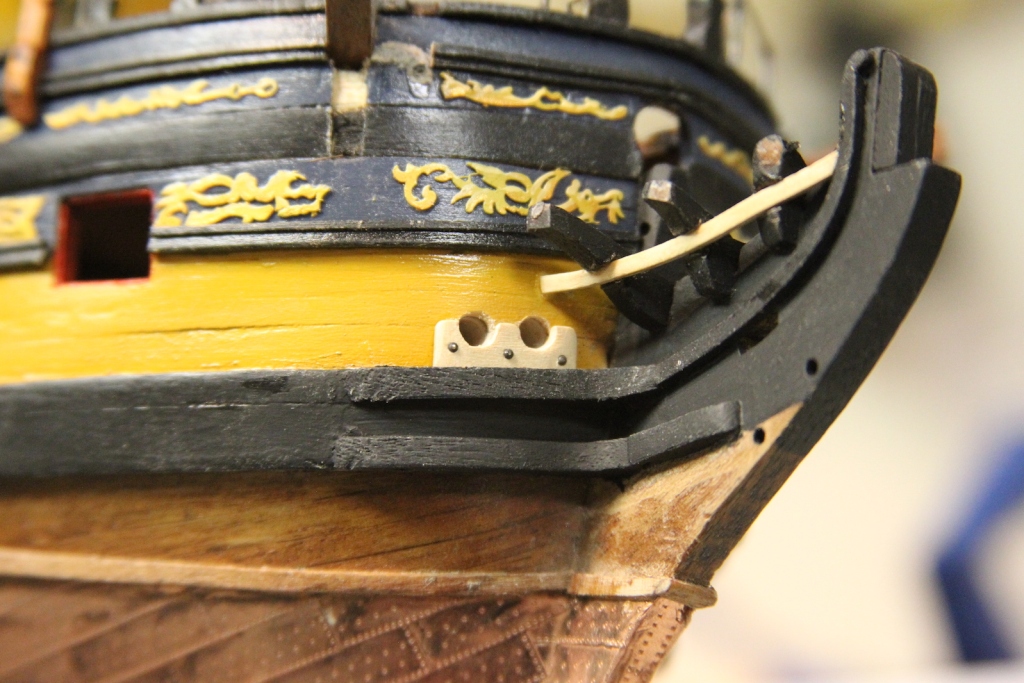
I started with the three timber heads which extend from the knee (forward part of the keel that creates the bow) and support the grating and rails. The timber heads are cut from the plan pattern and shaped in walnut so they’re a bit sturdier. I wanted to slim then down and reshape them a bit so they look (hopefully) more graceful as it comes together. The plan versions look a little thick and I want a more gentle curve as they work their way up to the rails.


As you can see in the third picture, there is still some shaping to be done so that the rails fit smoothly along the sides.
As a total side note – the bow doesn’t look as wonky and askew in person as it does in above middle picture. I focus stacked four different pictures so the timbers would be all in focus and sometimes when Photoshop “auto blends” the layers the rest of the photo can come out looking a little odd if you don’t use a tripod (which I didn’t).
Next up was the simple, yet always anxiety inducing job of cutting out the hawse holes. I marked them out and then used a very high speed drill bit to avoid flaking or other damage.
The hawse holes set the baseline for where the cheeks will be mounted. They set on the upper and lower edges of the main wales. However, I did run into a slight issue. Once again, because of the way I mounted those main wales so that they would be more accurate, the cheeks now conflicted with the gammoning slots when I extended the hair bracket from the upper cheek. Not a huge issue, I just drilled out more room for the gammoning and added the hair bracket moulding.


The main rails are the trickiest and most difficult part of the head works. I chose to cut them from boxwood in three separate pieces in order to achieve the most consistent “swoop.” I used a card stock template to measure out the necessary distance and curvature, then temporarily mounted the two end pieces onto the bow leaving the space in between. This allowed me to fill in and custom fit the middle “wedge” piece into the gap. Once it was all snug, I glued it together and and sanded it down. It’s worth nothing that there is also a slight inward angle between the three pieces allowing it to guide along the bow properly


The main rails are set aside for now to get to the lower railing. First, a filler piece of walnut is added where the Pegasus figure head will rest. Then, the lower railing runs along, and actually cut into, the head timbers. This piece is measured and cut from boxwood and slots are cut into the timber heads.
The hawse hole bolsters are cut, shaped, and fit into position so that the rest of the lower railing can be measured out as they run all the way up to the cat heads.


Those lower rails are carved out with a curve in a similar manner as the main rails. The cathead support is carved, shaped, and fit also from boxwood. I then painted everything with my color scheme.
I went ahead and gave this fitting a coat of paint and wipe on polyurethane before I progressed to the covering boards on the outer edges of the head timbers where there is going to be some VERY delicate painting, etc, and the coat of poly makes it much easier to clean up errant paint mistakes that occur as a result of my hands not being nearly as steady as the “good ol’ days”.
The covering boards are cut from my thinest stock and soaked before they are shaped along the head timbers. I did have to sand down the areas where the lower rail meets the head timbers to provide the necessary fitment. After they were dried and glued in place, I added a little bit of filler where needed and painted.


I heavily debated whether to add the little vertical strips of decoration along the covering boards or if that made it too busy. After a lot of holding it in place and debating, I finally decided that the added decoration somewhat detracts from my sketchy paint job. I REALLY had a hard time with those little yellow lines after trying to mask them off and everything else. I even tried using tiny strips of yellow tape but the color didn’t match the other ochre. I ultimately got the best results I could by just painting them free hand. The added vertical decorations also blend with the cheeks, so I’m cool with it.
Much of the grating is omitted in the plans as it’s quite a complicated endeavor. More complicated at such a small scale as 1/64, and I learned again that I needed to make some concessions and deviate from the exact plans for a swan class ship.
I cut, measure and place each piece individually because my scratch made rails and timber heads were fractionally uneven. Fractions of millimeters don’t seem like much, but they become noticeable quickly.
I started at the base of the bow, added the most forward supports and braces, marked out the locations of the grates, then filled in the grates in between. The process was basically to cut it close, test fit, sand the edge literally three or four strokes at a time, then test fit again until it slid into place.


In the picture above there’s one piece of grating missing on the starboard side. That’s because I thought I glued it in place but didn’t then when I shifted the model to take the picture it fell out and I didn’t notice until I saw the photo. It has since been replaced of course.
Next the “seats of ease” are added – simple toilets for the crew (the captain and other officers would have their own facilities in the cabins. The seats are rather simple to make and sized to be equal to one another. I shaved off thin little bits of the grating to get them to fit into the bow so they’d remain mirror images of one another.

The false rails were decorative boards that run along the main rails and add some privacy and wind protection for those on the bow, particularly when using the seats of ease.
I started with a card stock drawing fitted to the head rails, then carved them out of boxwood. Knowing my scratch build main rails would not be identical, I cut the false rails with a little extra room on the bottom end so they could be fitted neatly to the specific curvature of each main rail.


The inner relief was carved out using my smallest Dremel engraving attachment then smoothed out using a pointed burr. The rails were then mounted and painted. A small amount of filler was used in the areas that didn’t match up perfectly.
That addition wraps up the head works with the exception of the next step which is a milestone in any build – the figurehead.
